Иногда приходится сталкиваться с необходимостью оформления приложения в разном цвете не изменяя расположения и размеров UI элементов.
В этой статье расскажу об использовании тем и стилей в android.
Будет показано как применять стили для Button, EditText, ListView, TextView.
Для начала создадим новый проект и добавим в него два новых activity.
Для одного мы будем применять Theme.Green для второго Theme.Blue.
Я проект назвал AndroidStyle. Дополнительные activity: BlueThemeActivity, GreenThemeActivity.
Вот так вот выглядит только-что созданный проект:
Не забываем прописать activity в AndroidManifest файле.
Теперь добавим layout которому мы будем менять тему. Назовем stylish.xml, добавим в него наши UI элементы. Должно получиться что-то такое:
stylish.xml
Чтобы определить наши style="?attr/..." выделенные жирным шрифтом в stylish.xml нам необходимо добавить файл attrs.xml. Вот такой файл получается:
attrs.xml
Можно приступить к написанию стилей. Я покажу пример для синего стиля.
В папке res/values/ создадим файл styles.xml и напишем в него наш синий стиль для UI элементов.
Вот такой файл должен получиться:
styles.xml
blue_button.xml
Атрибут android:state_pressed="true" указывает на то что данный стиль применим для кнопки в нажатом состоянии.
blue_edit_text.xml
Атрибут android:state_pressed="true" указывает на то, какой стиль будет использоваться когда мы нажмем на EditText для ввода текста.
blue_list_view_item.xml
Теперь непосредственно создадим тему для наших стилей. Для этого в папке res/values/ создадим файл themes.xml. И применим в нем для наших атрибутов созданные стили.
themes.xml
android:buttonStyle, android:editTextStyle атрибуты по-умолчанию.
Теперь мы сделали все что необходимо для стилей и тем в нашем приложении. Применить созданный стиль мы можем в AndroidManifest файле для выбранного нами activity или же ( как сделал я ) определить стиль непосредственно в activity.
В AndroidManifest.xml это желается вот так:
В activity делается вот так:
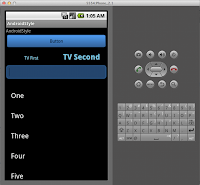
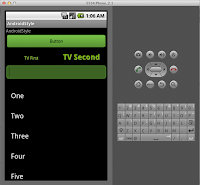
Посмотрим на результаты:
полный код приложения лежит вот тут -> AndroidStyle
прямая ссылка для скачивания архива -> Download
Вышло очень даже симпатично :). Спасибо за внимание.
P.S. Оставляем пожелания, комментарии, темы для рассмотрения. И кликаем +1, f, в, t, что располагаются чуть ниже статьи.
В этой статье расскажу об использовании тем и стилей в android.
Будет показано как применять стили для Button, EditText, ListView, TextView.
Для начала создадим новый проект и добавим в него два новых activity.
Для одного мы будем применять Theme.Green для второго Theme.Blue.
Я проект назвал AndroidStyle. Дополнительные activity: BlueThemeActivity, GreenThemeActivity.
Вот так вот выглядит только-что созданный проект:
Не забываем прописать activity в AndroidManifest файле.
<?xmlversion="1.0"encoding="utf-8"?><manifestxmlns:android="http://schemas.android.com/apk/res/android"package="com.lunevich.androidstyle"android:versionCode="1"android:versionName="1.0">//...<applicationandroid:icon="@drawable/ic_launcher"android:label="@string/app_name">//...<activityandroid:name=".activity.BlueThemeActivity"></activity><activityandroid:name=".activity.GreenThemeActivity"></activity></application> </manifest>
Теперь добавим layout которому мы будем менять тему. Назовем stylish.xml, добавим в него наши UI элементы. Должно получиться что-то такое:
stylish.xml
<?xmlversion="1.0"encoding="utf-8"?><LinearLayoutxmlns:android="http://schemas.android.com/apk/res/android"android:layout_width="fill_parent"android:layout_height="fill_parent"android:orientation="vertical"> <TextViewandroid:layout_width="fill_parent"android:layout_height="wrap_content"android:text="@string/app_name"/> <Button android:id="@+id/btn" android:layout_width="fill_parent" android:layout_height="wrap_content" android:layout_margin="3dp" android:text="@string/btn" /><LinearLayoutandroid:layout_width="fill_parent"android:layout_height="wrap_content"android:layout_marginBottom="10dp"android:layout_marginTop="10dp"android:orientation="horizontal"> <TextViewandroid:id="@+id/tv1"style="?attr/textView1"android:layout_width="fill_parent"android:layout_height="wrap_content"android:layout_weight="1"android:gravity="center"android:text="@string/tv1"android:textAppearance="?android:attr/textAppearanceMedium"/> <TextViewandroid:id="@+id/tv2"style="?attr/textView2"android:layout_width="fill_parent"android:layout_height="wrap_content"android:layout_weight="1"android:gravity="center"android:text="@string/tv2"android:textAppearance="?android:attr/textAppearanceMedium"/> </LinearLayout><EditTextandroid:id="@+id/editText"android:layout_width="fill_parent"android:layout_height="wrap_content"android:layout_marginBottom="10dp"android:ems="10"android:inputType="text"> <requestFocus /> </EditText><ListViewandroid:id="@+id/listView"android:layout_width="fill_parent"android:layout_height="fill_parent"> </ListView> </LinearLayout>
Чтобы определить наши style="?attr/..." выделенные жирным шрифтом в stylish.xml нам необходимо добавить файл attrs.xml. Вот такой файл получается:
attrs.xml
<?xmlversion="1.0"encoding="utf-8"?> <resources> <attrname="textView1"format="reference"/><attrname="textView2"format="reference"/></resources>
Можно приступить к написанию стилей. Я покажу пример для синего стиля.
В папке res/values/ создадим файл styles.xml и напишем в него наш синий стиль для UI элементов.
Вот такой файл должен получиться:
styles.xml
В нашем стиле используются drawable ресурсы drawable/blue_button.xml, drawable/blue_edit_text.xml, drawable/blue_list_view_item.xml. Для blue_button, blue_edit_text и blue_list_view_item создадим в папке res папку drawable и в ней файл blue_button.xml, blue_edit_text.xml и blue_list_view_item.xml. Добавим в наши созданные файлы вот такое контент ( он отвечает за внешний вид наших UI элементов ):<?xmlversion="1.0"encoding="utf-8"?> <resources><!-- =============== --> <!-- Blue styles --> <!-- =============== --> <!-- blue text view style --><stylename="blue_text_view_1"> <itemname="android:textColor">#60c4e4</item> <itemname="android:textSize">14sp</item> <itemname="android:gravity">center_vertical|left</item> <itemname="android:shadowDx">1.0</item> <itemname="android:shadowDy">1.0</item> <itemname="android:shadowRadius">1</item> <itemname="android:shadowColor">#DDD</item> </style><!-- blue text view style --><stylename="blue_text_view_2"> <itemname="android:textColor">#60c4e4</item> <itemname="android:textSize">24sp</item> <itemname="android:textStyle">bold</item> <itemname="android:gravity">center_vertical|left</item> <itemname="android:shadowDx">1.0</item> <itemname="android:shadowDy">1.0</item> <itemname="android:shadowRadius">1</item> <itemname="android:shadowColor">#DDD</item> </style><!-- blue button style --><stylename="blue_button" parent="@android:style/Widget.Button"> <itemname="android:background">@drawable/blue_button</item></style><!-- blue edit text style --><stylename="blue_edit_text" parent="@android:style/Widget.EditText"> <itemname="android:background">@drawable/blue_edit_text</item> </style><!-- blue edit text style --><stylename="blue_list_view"> <itemname="android:listSelector">@drawable/blue_list_view_item</item> </style> </resources>
blue_button.xml
В blue_button.xml прописан внешний вид кнопки в нажатом и не нажатом состоянии.<?xmlversion="1.0"encoding="utf-8"?> <selectorxmlns:android="http://schemas.android.com/apk/res/android"> <itemandroid:state_pressed="true"> <shape> <solidandroid:color="#449def"/> <strokeandroid:width="1dp"android:color="#2f6699"/> <cornersandroid:radius="3dp"/> <paddingandroid:bottom="10dp"android:left="10dp"android:right="10dp"android:top="10dp"/> </shape> </item> <item> <shape> <gradientandroid:angle="270"android:endColor="#2f6699"android:startColor="#449def"/> <strokeandroid:width="1dp"android:color="#2f6699"/> <cornersandroid:radius="4dp"/> <paddingandroid:bottom="10dp"android:left="10dp"android:right="10dp"android:top="10dp"/> </shape> </item> </selector>
Атрибут android:state_pressed="true" указывает на то что данный стиль применим для кнопки в нажатом состоянии.
blue_edit_text.xml
В blue_edit_text.xml прописан внешний вид EditText в активном и неактивном состоянии.<?xmlversion="1.0"encoding="utf-8"?> <selectorxmlns:android="http://schemas.android.com/apk/res/android"> <itemandroid:state_pressed="true"> <shape> <gradientandroid:angle="270"android:centerColor="#603C86C9"android:centerX="0.5"android:centerY="0.5"android:endColor="#9045A0F5"android:startColor="#403270A8"/> <strokeandroid:width="3dp"android:color="#50449def"/> <cornersandroid:radius="7dp"/> <paddingandroid:bottom="10dp"android:left="10dp"android:right="10dp"android:top="10dp"/> </shape> </item> <item> <shapeandroid:shape="rectangle"> <solidandroid:color="#20486E"/> <strokeandroid:width="3dp"android:color="#50449def"/> <cornersandroid:radius="7dp"/> <paddingandroid:bottom="10dp"android:left="10dp"android:right="10dp"android:top="10dp"/> </shape> </item> </selector>
Атрибут android:state_pressed="true" указывает на то, какой стиль будет использоваться когда мы нажмем на EditText для ввода текста.
blue_list_view_item.xml
<?xmlversion="1.0"encoding="utf-8"?> <selectorxmlns:android="http://schemas.android.com/apk/res/android"> <itemandroid:state_pressed="true"> <shape> <gradientandroid:angle="270"android:centerColor="#603C86C9"android:centerX="0.5"android:centerY="0.5"android:endColor="#9045A0F5"android:startColor="#403270A8"/> <strokeandroid:width="3dp"android:color="#50449def"/> <cornersandroid:radius="7dp"/> <paddingandroid:bottom="10dp"android:left="10dp"android:right="10dp"android:top="10dp"/> </shape> </item> <itemandroid:state_focused="true"> <shapeandroid:shape="rectangle"> <solidandroid:color="#20486E"/> <strokeandroid:width="3dp"android:color="#50449def"/> <cornersandroid:radius="7dp"/> <paddingandroid:bottom="10dp"android:left="10dp"android:right="10dp"android:top="10dp"/> </shape> </item> </selector>
Теперь непосредственно создадим тему для наших стилей. Для этого в папке res/values/ создадим файл themes.xml. И применим в нем для наших атрибутов созданные стили.
themes.xml
textView1 и textView2 наши собственные атрибуты, которые мы создали ранее в attrs.xml.<?xmlversion="1.0"encoding="utf-8"?> <resources><!-- =============== --> <!-- Blue theme --> <!-- =============== --><stylename="Theme.Blue"parent="@android:style/Theme"> <itemname="textView1">@style/blue_text_view_1</item> <itemname="textView2">@style/blue_text_view_2</item> <itemname="android:buttonStyle">@style/blue_button</item> <itemname="android:editTextStyle">@style/blue_edit_text</item><itemname="android:listViewStyle">@style/blue_list_view</item></style> </resources>
android:buttonStyle, android:editTextStyle атрибуты по-умолчанию.
Теперь мы сделали все что необходимо для стилей и тем в нашем приложении. Применить созданный стиль мы можем в AndroidManifest файле для выбранного нами activity или же ( как сделал я ) определить стиль непосредственно в activity.
В AndroidManifest.xml это желается вот так:
<?xmlversion="1.0"encoding="utf-8"?><manifestxmlns:android="http://schemas.android.com/apk/res/android"package="com.lunevich.androidstyle"android:versionCode="1"android:versionName="1.0">//...<applicationandroid:icon="@drawable/ic_launcher"android:label="@string/app_name">//...<activityandroid:name=".activity.BlueThemeActivity" android:theme="@style/Theme.Blue"></activity><activityandroid:name=".activity.GreenThemeActivity"android:theme="@style/Theme.Green"></activity></application> </manifest>
В activity делается вот так:
packagecom.lunevich.androidstyle.activity;importcom.lunevich.androidstyle.R;importandroid.app.Activity;importandroid.os.Bundle;importandroid.view.View;importandroid.view.View.OnClickListener;importandroid.widget.ArrayAdapter;importandroid.widget.Button;importandroid.widget.ListView;public class BlueThemeActivityextendsActivityimplementsOnClickListener {@Overridepublic voidonCreate(Bundle savedInstanceState) {super.onCreate(savedInstanceState); setTheme(R.style.Theme_Blue); setContentView(R.layout.stylish); String[] items = {"One","Two","Three","Four","Five"}; ListView listView = (ListView) findViewById(R.id.listView); listView.setAdapter(newArrayAdapter<String>(this, android.R.layout.simple_list_item_1, items)); Button btn = (Button) findViewById(R.id.btn); btn.setOnClickListener(this); }@Overridepublic voidonClick(View v) {switch(v.getId()) {caseR.id.btn: onBackPressed();break; } }@Overridepublic voidonBackPressed() {super.onBackPressed();this.finish(); } }
Посмотрим на результаты:
 |
| blue-theme |
 |
| green-theme |
полный код приложения лежит вот тут -> AndroidStyle
прямая ссылка для скачивания архива -> Download
Вышло очень даже симпатично :). Спасибо за внимание.
P.S. Оставляем пожелания, комментарии, темы для рассмотрения. И кликаем +1, f, в, t, что располагаются чуть ниже статьи.

Спасибо. Полезная статья :)
ОтветитьУдалитьда, спасибо, красиво получилось
ОтветитьУдалитьСпасибо +1 G+, допишу от себя, что при создании объектов программным способом, стиль объекта задается в конструкторе класса , к примеру:
ОтветитьУдалитьButton btn = new Button(this, null, R.attr.textView1);
спасибо, но не могу качать исходник
ОтветитьУдалитьПривет, исходники скачиваются (добавил прямую svn ссылку в статью).
УдалитьНе работает ссылка.
ОтветитьУдалитьКакая из ссылок не работает ?
Удалить1 - AndroidStyle - ведет на проект
2 - прямая ссылка - нужно вставлять в Terminal, Console или какой-нибудь svn клиент.
Offshore Development Center is helping companies develop quality software at lower costs. Learn how ODC work, and which countries are best suited to host them.
ОтветитьУдалитьI am really happy to say it’s an interesting post to read . I learn new information from your blog.
ОтветитьУдалитьMobile App Development Company
I am really happy to say it’s an interesting post to read. ANd I learnd more information from your blog.
ОтветитьУдалитьThnaks
online pharmacy app development