Иногда приходится сталкиваться с необходимостью оформления приложения в разном цвете не изменяя расположения и размеров UI элементов.
В этой статье расскажу об использовании тем и стилей в android.
Будет показано как применять стили для Button, EditText, ListView, TextView.
Для начала создадим новый проект и добавим в него два новых activity.
Для одного мы будем применять Theme.Green для второго Theme.Blue.
Я проект назвал AndroidStyle.
Дополнительные activity: BlueThemeActivity, GreenThemeActivity.
Вот так вот выглядит только-что созданный проект:
Не забываем прописать activity в AndroidManifest файле.
 <?xml version="1.0" encoding="utf-8"?>
 <manifest xmlns:android="http://schemas.android.com/apk/res/android"
   package="com.lunevich.androidstyle"
   android:versionCode="1"
   android:versionName="1.0" >
   //...

   <application
     android:icon="@drawable/ic_launcher"
     android:label="@string/app_name" >
     //...

     <activity android:name=".activity.BlueThemeActivity" ></activity>
     <activity android:name=".activity.GreenThemeActivity" ></activity>

   </application>
 </manifest>
Теперь добавим layout которому мы будем менять тему. Назовем stylish.xml, добавим в него наши UI элементы. Должно получиться что-то такое:
stylish.xml
 <?xml version="1.0" encoding="utf-8"?>
 <LinearLayout xmlns:android="http://schemas.android.com/apk/res/android"
   android:layout_width="fill_parent"
   android:layout_height="fill_parent"
   android:orientation="vertical" >
   <TextView
     android:layout_width="fill_parent"
     android:layout_height="wrap_content"
     android:text="@string/app_name" />
   <Button
     android:id="@+id/btn"
     android:layout_width="fill_parent"
     android:layout_height="wrap_content"
     android:layout_margin="3dp"
     android:text="@string/btn" />
   <LinearLayout
     android:layout_width="fill_parent"
     android:layout_height="wrap_content"
     android:layout_marginBottom="10dp"
     android:layout_marginTop="10dp"
     android:orientation="horizontal" >
     <TextView
       android:id="@+id/tv1"
       style="?attr/textView1"
       android:layout_width="fill_parent"
       android:layout_height="wrap_content"
       android:layout_weight="1"
       android:gravity="center"
       android:text="@string/tv1"
       android:textAppearance="?android:attr/textAppearanceMedium" />
     <TextView
       android:id="@+id/tv2"
       style="?attr/textView2"
       android:layout_width="fill_parent"
       android:layout_height="wrap_content"
       android:layout_weight="1"
       android:gravity="center"
       android:text="@string/tv2"
       android:textAppearance="?android:attr/textAppearanceMedium" />
   </LinearLayout>
   <EditText
     android:id="@+id/editText"
     android:layout_width="fill_parent"
     android:layout_height="wrap_content"
     android:layout_marginBottom="10dp"
     android:ems="10"
     android:inputType="text" >
     <requestFocus />
   </EditText>
   <ListView
     android:id="@+id/listView"
     android:layout_width="fill_parent"
     android:layout_height="fill_parent" >
   </ListView>
 </LinearLayout>
Чтобы определить наши style="?attr/..." выделенные жирным шрифтом в stylish.xml нам необходимо добавить файл attrs.xml. Вот такой файл получается:
attrs.xml
 <?xml version="1.0" encoding="utf-8"?>
 <resources>
   <attr name="textView1" format="reference" />
   <attr name="textView2" format="reference" />
 </resources>
Можно приступить к написанию стилей. Я покажу пример для синего стиля.
В папке res/values/ создадим файл styles.xml и напишем в него наш синий стиль для UI элементов.
Вот такой файл должен получиться:
styles.xml
 <?xml version="1.0" encoding="utf-8"?>
 <resources>

   <!-- =============== -->
   <!--   Blue styles   -->
   <!-- =============== -->

   <!-- blue text view style -->
   <style name="blue_text_view_1">
       <item name="android:textColor">#60c4e4</item>
       <item name="android:textSize">14sp</item>
       <item name="android:gravity">center_vertical|left</item>
       <item name="android:shadowDx">1.0</item>
       <item name="android:shadowDy">1.0</item>
       <item name="android:shadowRadius">1</item>
       <item name="android:shadowColor">#DDD</item>
   </style>

   <!-- blue text view style -->
   <style name="blue_text_view_2">
       <item name="android:textColor">#60c4e4</item>
       <item name="android:textSize">24sp</item>
       <item name="android:textStyle">bold</item>
       <item name="android:gravity">center_vertical|left</item>
       <item name="android:shadowDx">1.0</item>
       <item name="android:shadowDy">1.0</item>
       <item name="android:shadowRadius">1</item>
       <item name="android:shadowColor">#DDD</item>
   </style>

   <!-- blue button style -->
   <style name="blue_button" parent="@android:style/Widget.Button">
       <item name="android:background">@drawable/blue_button</item>
   </style>

   <!-- blue edit text style -->
   <style name="blue_edit_text" parent="@android:style/Widget.EditText">
       <item name="android:background">@drawable/blue_edit_text</item>
   </style>

   <!-- blue edit text style -->
   <style name="blue_list_view">
       <item name="android:listSelector">@drawable/blue_list_view_item</item>
   </style>

 </resources>
В нашем стиле используются drawable ресурсы drawable/blue_button.xml, drawable/blue_edit_text.xml, drawable/blue_list_view_item.xml. Для blue_button, blue_edit_text и blue_list_view_item создадим в папке res папку drawable и в ней файл blue_button.xml, blue_edit_text.xml и
blue_list_view_item.xml. Добавим в наши созданные файлы вот такое контент ( он отвечает за внешний вид наших UI элементов ):
blue_button.xml
 <?xml version="1.0" encoding="utf-8"?>
 <selector xmlns:android="http://schemas.android.com/apk/res/android">
   <item android:state_pressed="true">
     <shape>
       <solid android:color="#449def" />
       <stroke android:width="1dp" android:color="#2f6699" />
       <corners android:radius="3dp" />
       <padding android:bottom="10dp" android:left="10dp" android:right="10dp" android:top="10dp" />
     </shape>
   </item>
   <item>
     <shape>
       <gradient android:angle="270" android:endColor="#2f6699" android:startColor="#449def" />
       <stroke android:width="1dp" android:color="#2f6699" />
       <corners android:radius="4dp" />
       <padding android:bottom="10dp" android:left="10dp" android:right="10dp" android:top="10dp" />
     </shape>
   </item>
 </selector>
В blue_button.xml прописан внешний вид кнопки в нажатом и не нажатом состоянии.
Атрибут android:state_pressed="true" указывает на то что данный стиль применим для кнопки в нажатом состоянии.
blue_edit_text.xml
 <?xml version="1.0" encoding="utf-8"?>
 <selector xmlns:android="http://schemas.android.com/apk/res/android">
   <item android:state_pressed="true">
     <shape>
       <gradient android:angle="270" android:centerColor="#603C86C9" android:centerX="0.5" android:centerY="0.5" android:endColor="#9045A0F5" android:startColor="#403270A8" />
       <stroke android:width="3dp" android:color="#50449def" />
       <corners android:radius="7dp" />
       <padding android:bottom="10dp" android:left="10dp" android:right="10dp" android:top="10dp" />
     </shape>
   </item>
   <item>
     <shape android:shape="rectangle">
       <solid android:color="#20486E" />
       <stroke android:width="3dp" android:color="#50449def" />
       <corners android:radius="7dp" />
       <padding android:bottom="10dp" android:left="10dp" android:right="10dp" android:top="10dp" />
     </shape>
   </item>
 </selector>
В blue_edit_text.xml прописан внешний вид EditText в активном и неактивном состоянии.
Атрибут
android:state_pressed="true" указывает на то, какой стиль будет использоваться когда мы нажмем на EditText для ввода текста.
blue_list_view_item.xml
 <?xml version="1.0" encoding="utf-8"?>
 <selector xmlns:android="http://schemas.android.com/apk/res/android">
   <item android:state_pressed="true">
     <shape>
       <gradient android:angle="270" android:centerColor="#603C86C9" android:centerX="0.5" android:centerY="0.5" android:endColor="#9045A0F5" android:startColor="#403270A8" />
       <stroke android:width="3dp" android:color="#50449def" />
       <corners android:radius="7dp" />
       <padding android:bottom="10dp" android:left="10dp" android:right="10dp" android:top="10dp" />
     </shape>
   </item>
   <item android:state_focused="true">
     <shape android:shape="rectangle">
       <solid android:color="#20486E" />
       <stroke android:width="3dp" android:color="#50449def" />
       <corners android:radius="7dp" />
       <padding android:bottom="10dp" android:left="10dp" android:right="10dp" android:top="10dp" />
     </shape>
   </item>
 </selector>
Теперь непосредственно создадим тему для наших стилей. Для этого в папке res/values/ создадим файл themes.xml. И применим в нем для наших атрибутов созданные стили.
themes.xml
 <?xml version="1.0" encoding="utf-8"?>
 <resources>

   <!-- =============== -->
   <!--   Blue theme    -->
   <!-- =============== -->

   <style name="Theme.Blue" parent="@android:style/Theme">
     <item name="textView1">@style/blue_text_view_1</item>
     <item name="textView2">@style/blue_text_view_2</item>
     <item name="android:buttonStyle">@style/blue_button</item>
     <item name="android:editTextStyle">@style/blue_edit_text</item>
     <item name="android:listViewStyle">@style/blue_list_view</item>
   </style>
 </resources>
textView1 и textView2 наши собственные атрибуты, которые мы создали ранее в attrs.xml.
android:buttonStyle, android:editTextStyle атрибуты по-умолчанию.
Теперь мы сделали все что необходимо для стилей и тем в нашем приложении. Применить созданный стиль мы можем в AndroidManifest файле для выбранного нами activity или же ( как сделал я ) определить стиль непосредственно в activity.
В AndroidManifest.xml это желается вот так:
 <?xml version="1.0" encoding="utf-8"?>
 <manifest xmlns:android="http://schemas.android.com/apk/res/android"
   package="com.lunevich.androidstyle"
   android:versionCode="1"
   android:versionName="1.0" >
   //...

   <application
     android:icon="@drawable/ic_launcher"
     android:label="@string/app_name" >
     //...

     <activity android:name=".activity.BlueThemeActivity" android:theme="@style/Theme.Blue"></activity>
     <activity android:name=".activity.GreenThemeActivity" android:theme="@style/Theme.Green"></activity>

   </application>
 </manifest>
В activity делается вот так:
 package com.lunevich.androidstyle.activity;

 import com.lunevich.androidstyle.R;

 import android.app.Activity;
 import android.os.Bundle;
 import android.view.View;
 import android.view.View.OnClickListener;
 import android.widget.ArrayAdapter;
 import android.widget.Button;
 import android.widget.ListView;

 public class BlueThemeActivity extends Activity implements OnClickListener {

      @Override
      public void onCreate(Bundle savedInstanceState) {
           super.onCreate(savedInstanceState);

           setTheme(R.style.Theme_Blue);
           setContentView(R.layout.stylish);

           String[] items = { "One", "Two", "Three", "Four", "Five" };
           ListView listView = (ListView) findViewById(R.id.listView);
           listView.setAdapter(new ArrayAdapter<String>(this, android.R.layout.simple_list_item_1, items));

           Button btn = (Button) findViewById(R.id.btn);
           btn.setOnClickListener(this);
      }

      @Override
      public void onClick(View v) {
           switch (v.getId()) {
           case R.id.btn:
                onBackPressed();
                break;
           }
      }

      @Override
      public void onBackPressed() {
           super.onBackPressed();
           this.finish();
      }
 }
Посмотрим на результаты:
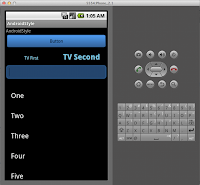 |
| blue-theme |
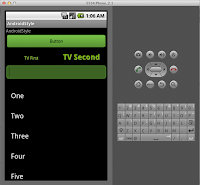 |
| green-theme |
полный код приложения лежит вот тут ->
AndroidStyle
прямая ссылка для скачивания архива ->
Download
Вышло очень даже симпатично :). Спасибо за внимание.
P.S. Оставляем пожелания, комментарии, темы для рассмотрения. И кликаем +1, f, в, t, что располагаются чуть ниже статьи.


